


获取家里NAS的公网IP地址并进行域名DNS解析
前置条件:
你家里的宽带是开通了公网服务的,电信的公网直接打电话开通即可。
你有一台NAS或者其他Linux系统二开的NAS服务器。
购买了阿里云或者腾讯云的域名。
必须能安装Python3.7+以上的环境
以上条件缺一不可。
由于我的域名是在腾讯云上面购买的,所以下面的教程只适合腾讯云的DNS解析,如果你是阿里云购买的域名就是要阿里云的API接口即可。
核心思路:每次运行一遍脚本去对比本地存储的公网IP地址是否已经发生变化,发生变化后直接使用脚本去修改DNS记录,这样就不用频繁使用IP去访问你的NAS了。
腾讯云DNS配置
准备工具网站:
具体操作步骤:
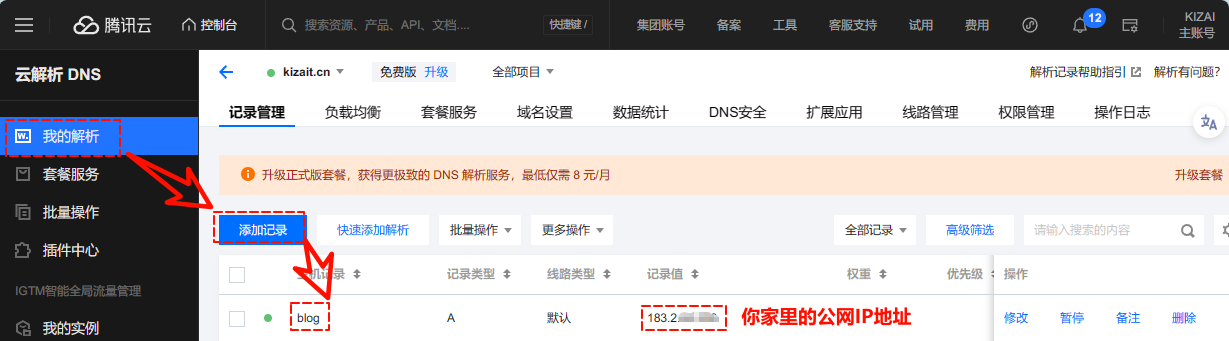
添加DNS记录
在腾讯云控制台上搜索DNS解析,点击进去添加DNS记录,添加例子如下:
获取域名的RecordID:https://console.cloud.tencent.com/api/explorer?Product=dnspod&Version=2021-03-23&Action=DescribeRecordList
.png)
修改DNS记录API:https://console.cloud.tencent.com/api/explorer?Product=dnspod&Version=2021-03-23&Action=ModifyRecord
.png)
可以去控制台验证下它是否已经更新了,可以看到下面的已经更新了
.png)
获取你的密钥可前往官网控制台 https://console.cloud.tencent.com/cam/capi
.png)
将上面的密钥复制下来备用。
添加钉钉机器人,获取Webhook链接以及密钥,这个自行Google,很简单的就不做介绍了。
python环境包安装:
pip install tencentcloud-sdk-python-cvm
pip install tencentcloud-sdk-python-dnspod
pip install requests
把脚本放在一个文件夹方便你寻找并查看log,我的就放在/home/Scripts下。
主程序代码:get_public_ip.py
#!/usr/bin/env python
"""
-------------------------------------------------
FileName: get_public_ip
Description:
Author: Kizai
Date: 2024/5/12
-------------------------------------------------
"""
# -*- coding: UTF-8 -*-
import os.path
import requests
import time
import hmac
import urllib
import base64
import hashlib
import json
import logging
import datetime
# pip install tencentcloud-sdk-python-cvm
from tencentcloud.common import credential
from tencentcloud.common.profile.client_profile import ClientProfile
from tencentcloud.common.profile.http_profile import HttpProfile
from tencentcloud.common.exception.tencent_cloud_sdk_exception import TencentCloudSDKException
from tencentcloud.dnspod.v20210323 import dnspod_client, models
log_path = '/volume1/homes/kizai/Scripts/get_public_ip.log'
logging.basicConfig(filename=log_path, filemode='a+', level=logging.INFO,
format='%(asctime)s %(levelname)s %(filename)s %(funcName)s %(lineno)d %(message)s',
datefmt="%Y-%m-%d %H:%M:%S")
# 钉钉机器人webhook地址 key
webhook = 'https://oapi.dingtalk.com/robot/send?access_token=879676ba8a34fc6ed674ca0ce*************a1406f284f3b49ce34b1f6'
secrets = 'SEC8eb0182826a2d5ed684**************f5ae9b86e6afdf994cf89aea1'
# 腾讯云密钥
SecretId = 'AKIDpTrypPZ*****i8ICpBH6dtsb3'
SecretKey = 'B6k7C1Zrsc****sBE0VjfMmTv75mC'
# 加签
def signature_url(webhook_url: str, secret: str):
# 生成当前时间戳,单位是毫秒,与请求调用时间误差不能超过1小时
timestamp = str(round(time.time() * 1000))
# 修改编码格式为utf-8
secret_enc = secret.encode('utf-8')
# 将timestamp和secret合并
string_to_sign = '{}\n{}'.format(timestamp, secret)
# 修改编码格式为utf-8
string_to_sign_enc = string_to_sign.encode('utf-8')
# 将字段进行加密,加密类型采用sha256
hmac_code = hmac.new(secret_enc, string_to_sign_enc, digestmod=hashlib.sha256).digest()
sign = urllib.parse.quote_plus(base64.b64encode(hmac_code))
# 生成请求的URL,WebHook地址
post_url = ("%s×tamp=%s&sign=%s" % (webhook_url, timestamp, sign))
logging.info(post_url)
return post_url
# 发送Text信息
def send_msg(text: str, is_at_all: str = False, at_user_id: str = None):
headers = {'Content-Type': 'application/json;charset=utf-8'}
url = signature_url(webhook, secrets)
data = {
"msgtype": "text",
"text": {
"content": text
},
"at": {
"atMobiles": [
],
"atUserIds": [at_user_id
],
"isAtAll": is_at_all
}
}
r = requests.post(url, data=json.dumps(data), headers=headers)
logging.info(r.text)
return r.text
# 发送MarkDown信息
def send_markdown_msg(title: str, text: str, is_at_all: str = False, at_user_id: str = None):
headers = {'Content-Type': 'application/json;charset=utf-8'}
url = signature_url(webhook, secrets)
data = {
"msgtype": "markdown",
"markdown": {"title": title,
"text": text},
"at": {
"atMobiles": [
],
"atUserIds": [at_user_id
],
"isAtAll": is_at_all
}
}
r = requests.post(url, data=json.dumps(data), headers=headers)
logging.info(r.text)
return r.text
def get_public_ip():
url = "https://api.ipify.org?format=text"
payload = ""
headers = {}
response = requests.request("GET", url, headers=headers, data=payload)
public_ip = response.text
logging.info(f"当前的公网IP为:{public_ip}")
return public_ip
# 检查前一天的IP地址
def get_previous_ip(filepath: str) -> str:
if os.path.exists(filepath):
with open(filepath, 'r') as f:
return f.read().strip()
return None
# 保存当前的IP地址以供将来检查
def save_current_ip(filepath: str, ip: str):
with open(filepath, 'w') as f:
f.write(ip)
def update_nas_dns(ip: str):
try:
# 实例化一个认证对象,入参需要传入腾讯云账户 SecretId 和 SecretKey,此处还需注意密钥对的保密
# 代码泄露可能会导致 SecretId 和 SecretKey 泄露,并威胁账号下所有资源的安全性。以下代码示例仅供参考,建议采用更安全的方式来使用密 钥,请参见:https://cloud.tencent.com/document/product/1278/85305
# 密钥可前往官网控制台 https://console.cloud.tencent.com/cam/capi 进行获取
cred = credential.Credential(SecretId, SecretKey)
# 实例化一个http选项,可选的,没有特殊需求可以跳过
httpProfile = HttpProfile()
httpProfile.endpoint = "dnspod.tencentcloudapi.com"
# 实例化一个client选项,可选的,没有特殊需求可以跳过
clientProfile = ClientProfile()
clientProfile.httpProfile = httpProfile
# 实例化要请求产品的client对象,clientProfile是可选的
client = dnspod_client.DnspodClient(cred, "", clientProfile)
# 实例化一个请求对象,每个接口都会对应一个request对象
req = models.ModifyDynamicDNSRequest()
params = {
"Domain": "kizait.cn",
"SubDomain": "nas",
"RecordId": 1635619434,
"RecordLine": "默认",
"Value": ip
}
req.from_json_string(json.dumps(params))
# 返回的resp是一个ModifyDynamicDNSResponse的实例,与请求对象对应
resp = client.ModifyDynamicDNS(req)
# 输出json格式的字符串回包
logging.info(resp.to_json_string())
except TencentCloudSDKException as err:
logging.error(err)
def update_blog_dns(ip: str):
try:
# 实例化一个认证对象,入参需要传入腾讯云账户 SecretId 和 SecretKey,此处还需注意密钥对的保密
# 代码泄露可能会导致 SecretId 和 SecretKey 泄露,并威胁账号下所有资源的安全性。以下代码示例仅供参考,建议采用更安全的方式来使用密 钥,请参见:https://cloud.tencent.com/document/product/1278/85305
# 密钥可前往官网控制台 https://console.cloud.tencent.com/cam/capi 进行获取
cred = credential.Credential(SecretId, SecretKey)
# 实例化一个http选项,可选的,没有特殊需求可以跳过
httpProfile = HttpProfile()
httpProfile.endpoint = "dnspod.tencentcloudapi.com"
# 实例化一个client选项,可选的,没有特殊需求可以跳过
clientProfile = ClientProfile()
clientProfile.httpProfile = httpProfile
# 实例化要请求产品的client对象,clientProfile是可选的
client = dnspod_client.DnspodClient(cred, "", clientProfile)
# 实例化一个请求对象,每个接口都会对应一个request对象
req = models.ModifyDynamicDNSRequest()
params = {
"Domain": "kizait.cn",
"SubDomain": "blog",
"RecordId": 1781254170,
"RecordLine": "默认",
"Value": ip
}
req.from_json_string(json.dumps(params))
# 返回的resp是一个ModifyDynamicDNSResponse的实例,与请求对象对应
resp = client.ModifyDynamicDNS(req)
# 输出json格式的字符串回包
logging.info(resp.to_json_string())
except TencentCloudSDKException as err:
logging.error(err)
if __name__ == "__main__":
ip_filepath = '/volume1/homes/kizai/Scripts/previous_ip.txt'
new_ip = get_public_ip()
previous_ip = get_previous_ip(ip_filepath)
if new_ip and (not previous_ip or new_ip != previous_ip):
update_nas_dns(new_ip) # 更新NAS DNS
update_blog_dns(new_ip) # 更新Blog DNS
title = "公网IP地址更新:"
text = (
f"# **Kizai's NAS公网IP:** \n## {new_ip}\n\n已自动为你更新DNS记录,请前往[腾讯云控制台](https://console.cloud.tencent.com/cns/detail/kizait.cn/records)查看。\n\n"
f"\n\n")
logging.info(text)
send_markdown_msg(title, text)
save_current_ip(ip_filepath, new_ip) # 保存新的IP
elif not new_ip:
title = "⚠⚠警告⚠⚠"
text = "Kizai's NAS公网IP获取失败,请检查网络情况!!\n[kk](https://telegraph-image-9gk.pages.dev/file/94d460777c79de403a677.gif)"
logging.info(text)
send_markdown_msg(title, text)
设置没10分钟运行一次:
sudo su
# 添加定时任务
vim /etc/crontab
# 添加下面这行,根据你的脚本路径来。
*/10 *   *   *   *   root    /bin/python /volume1/homes/kizai/Scripts/get_public_ip.py
运行结果查看:
.png)